Gulp is an amazing tool that helps developers build better running projects and cleaner flow of code. In this tutorial I will go over how easy it is to get started with Gulp.js that you have to check out. It let’s you compile sass to css, compile javascript files, compress code and a lot more in just a few lines of code.
Why Would I Need A Task Builder?
Very good question young padawan, let’s say in your project you had a js file for jQuery, Bootstrap, different Angular controllers and more stuff. Normally at the end of the body tag in the html is where one would regular add all the scripts tag for each file. But with Gulp, we can write as little as a few lines of code, and all our js files would be combined into one singular file. In doing so, our web app or site would just need to render one javascript file, instead of say 3, 4 , 5, etc etc.
Installing Gulp
For this project we will learn how we could use gulp in our development workflow. You should have node and/or npm installed. I’ve created a started project you can git clone or download from here. For this project I have a simple bootstrap website we will use to view our progress.
Once you have successfully downloaded the starter files, you can npm init -y. To be able to use gulp we will need to download it to our global dependencies AND our project dependencies.
To install in our global dependencies well use -g
npm install gulp -g
And to install in our project and save to your developer dependencies
npm install gulp --save-dev
Great so now we are setup up and ready, now if you open the index.html you will just our content without any styling. Lets work on that now and start compiling our Sass, for that let’s quickly npm install gulp-sass.
npm install gulp-sass --save-dev
In gulp, in order to build task, we can use pre-made packages that do the heavy lifting for us. In this case, we use use gulp-sass, but we’re also going to check out gulp-uglify,concat and more.
Getting Started
In your project directory let’s create a new file called gulpfile.js ’. Gulp recognises any file with the name of gulpfile. Here we are going to use use strict’ statement inside an IFFE or Immediately-Invoked Function Expression. For each gulp package we’ll have to import it to our gulpfile. So let’s import our gulp, and gulp-sass.
Now after our dependencies import we’ll set up our first gulp task to compile ALL our Sass files, and incase you haven’t seen, there is a lot! To set a task in gulp, we declare a gulp.task() method with the name of the task, and an anonymous function which where we’ll define our task.
(function() {
'use strict';

var gulp = require('gulp');
var sass = require(gulp-sass’);
gulp.task ('compileSass', function(){
    gulp.src("scss/bootstrap.scss")
    .pipe(sass())
    .pipe(gulp.dest('./css'));
});

}());
Now the .pipe method sends data to our compile task, think of like it is compiling all our sass code and files and piping ’ to destination or dest ’ in our css folder. So let’s run this task, and to do so in our console or terminal let’s run gulp and the name of our task which in this case would be compileSass Now if refresh our index.html page you will see a site fresh with life and color.
Congrats you’ve compiled Sass, now if check on our CSS folder you will see a bootstrap.css file with all our compiled Sass code. Later on we will work on a Watch Sass function that will watch and update both our Sass and Javascript files.
Sass Maps
Now in case you didn’t know yet, when using the Chrome Developer tools, if you wanted to change and view the styling for anything, we can often see in which CSS file and line our target is located. But now since we are compiling our dozens of sass into a single CSS file, how can we find out which Sass file it’s in? This is a great opportunity for Sass maps. Check out the example below and let’s get started
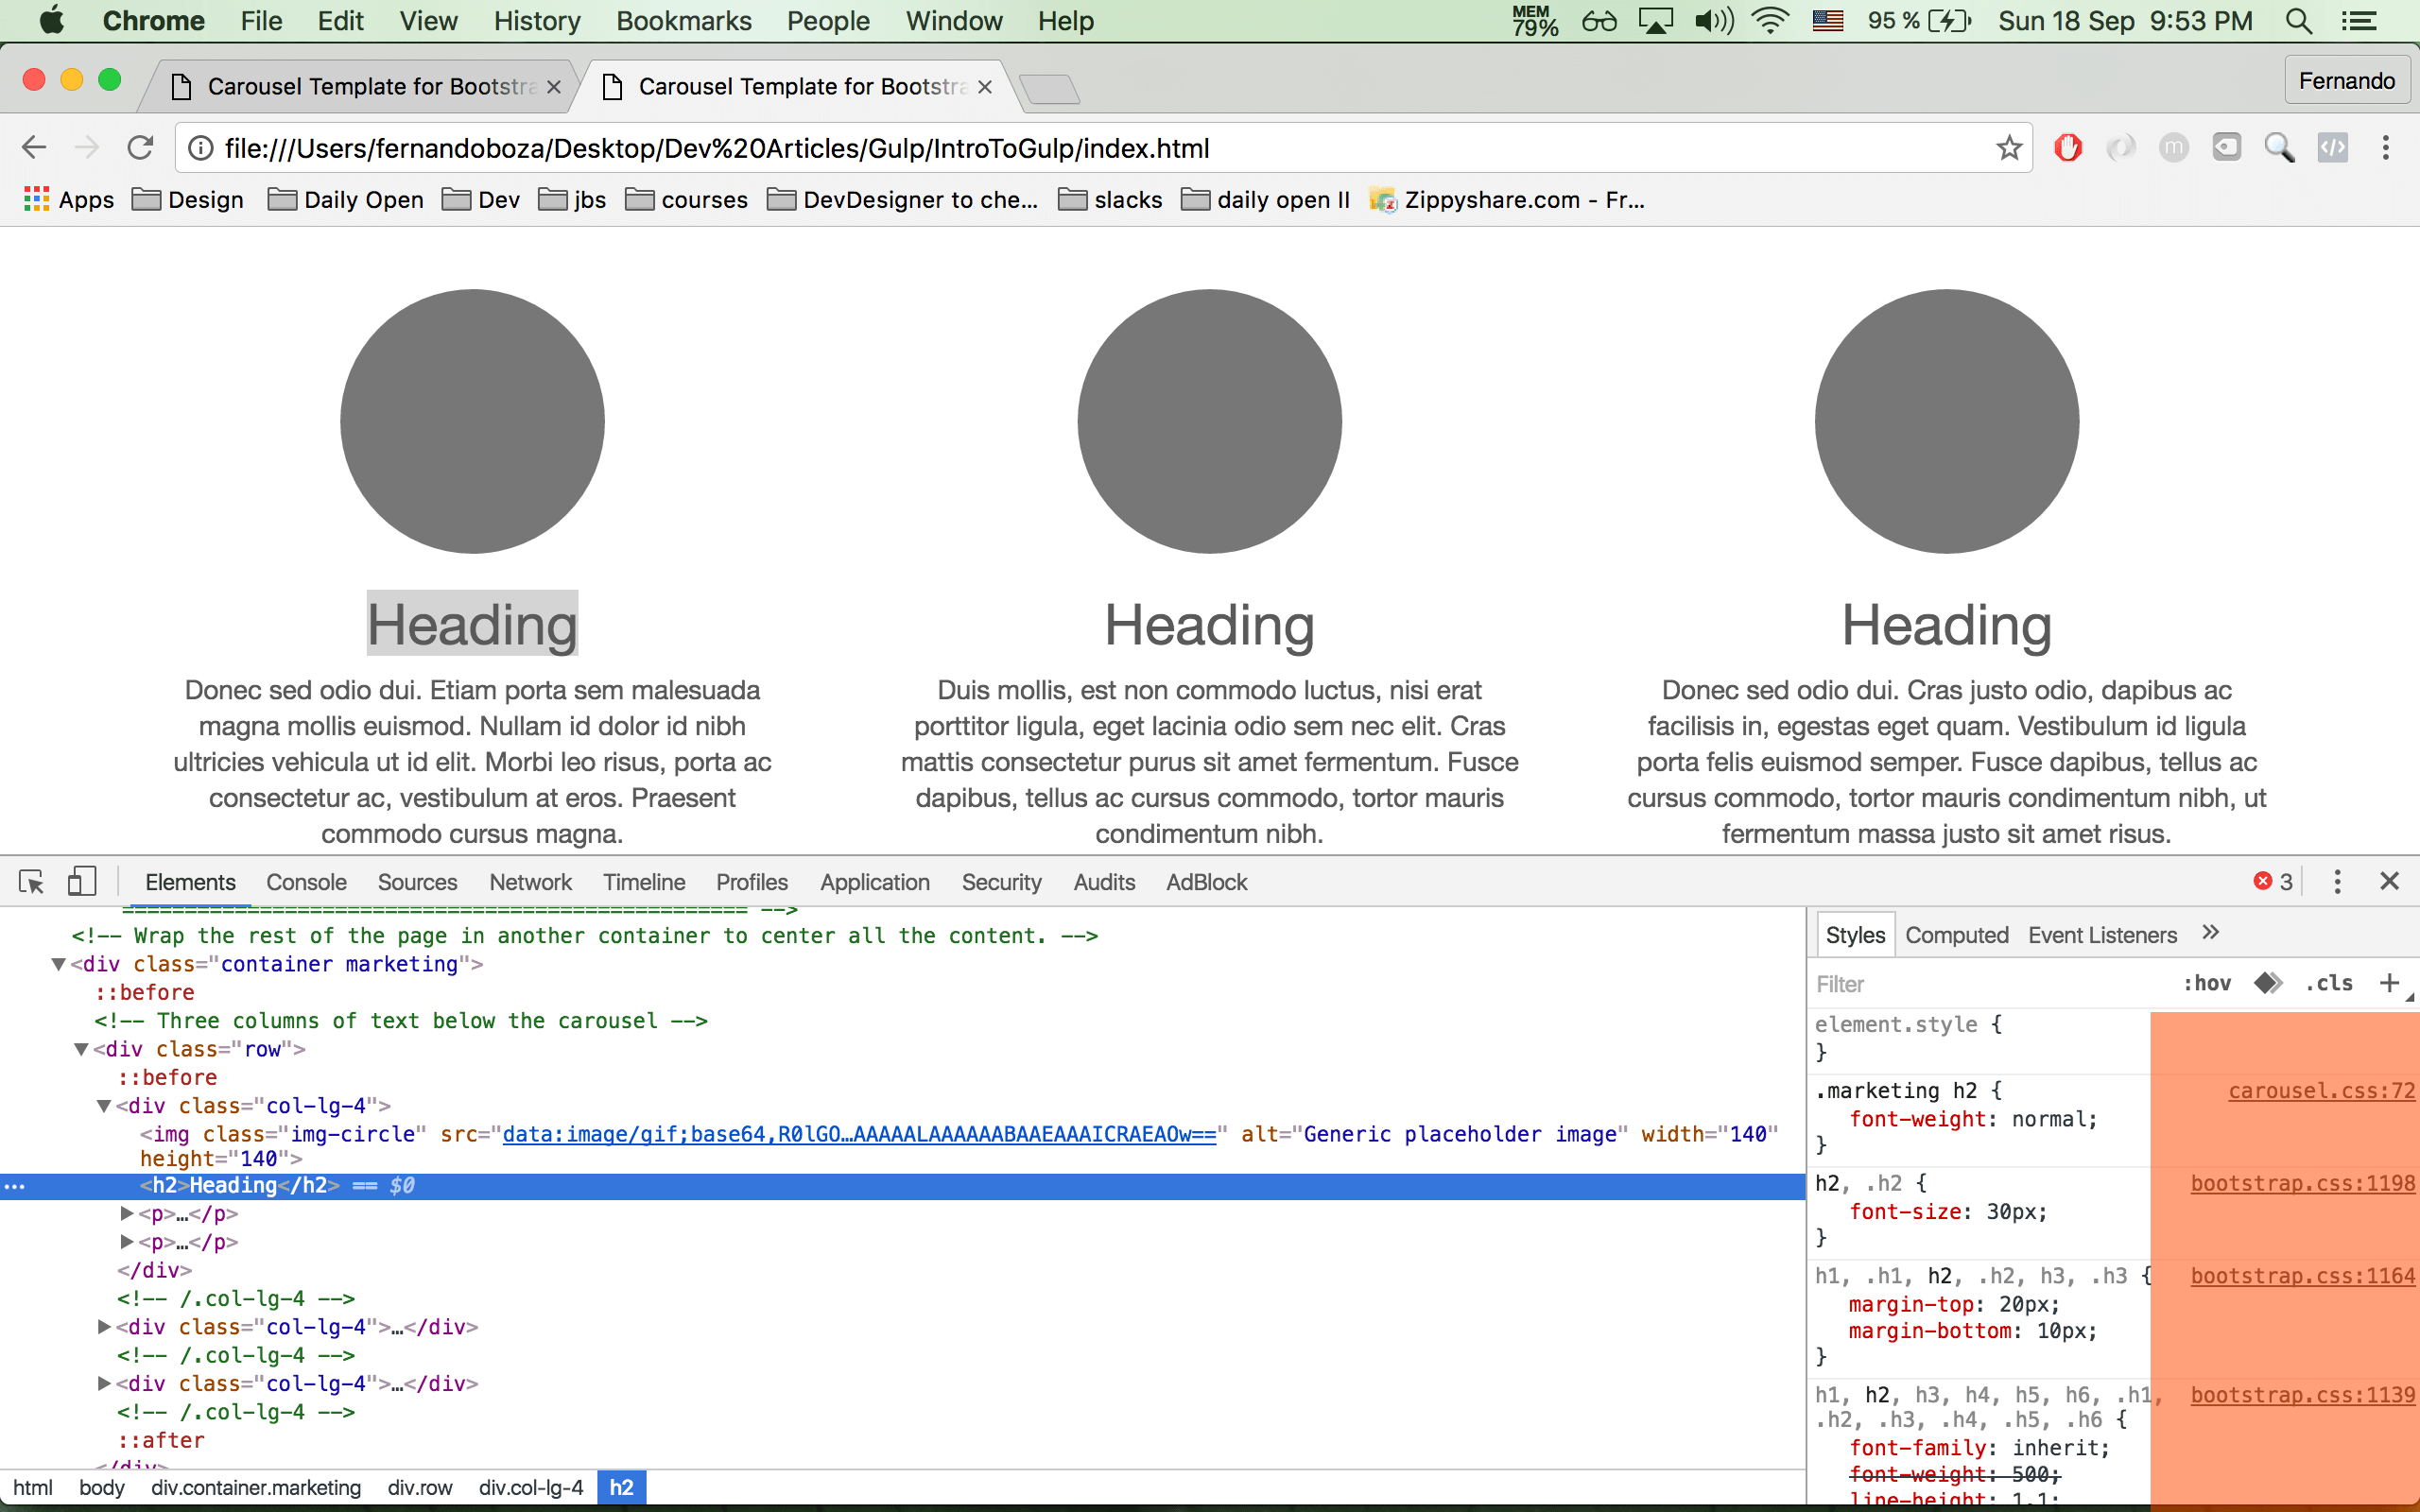
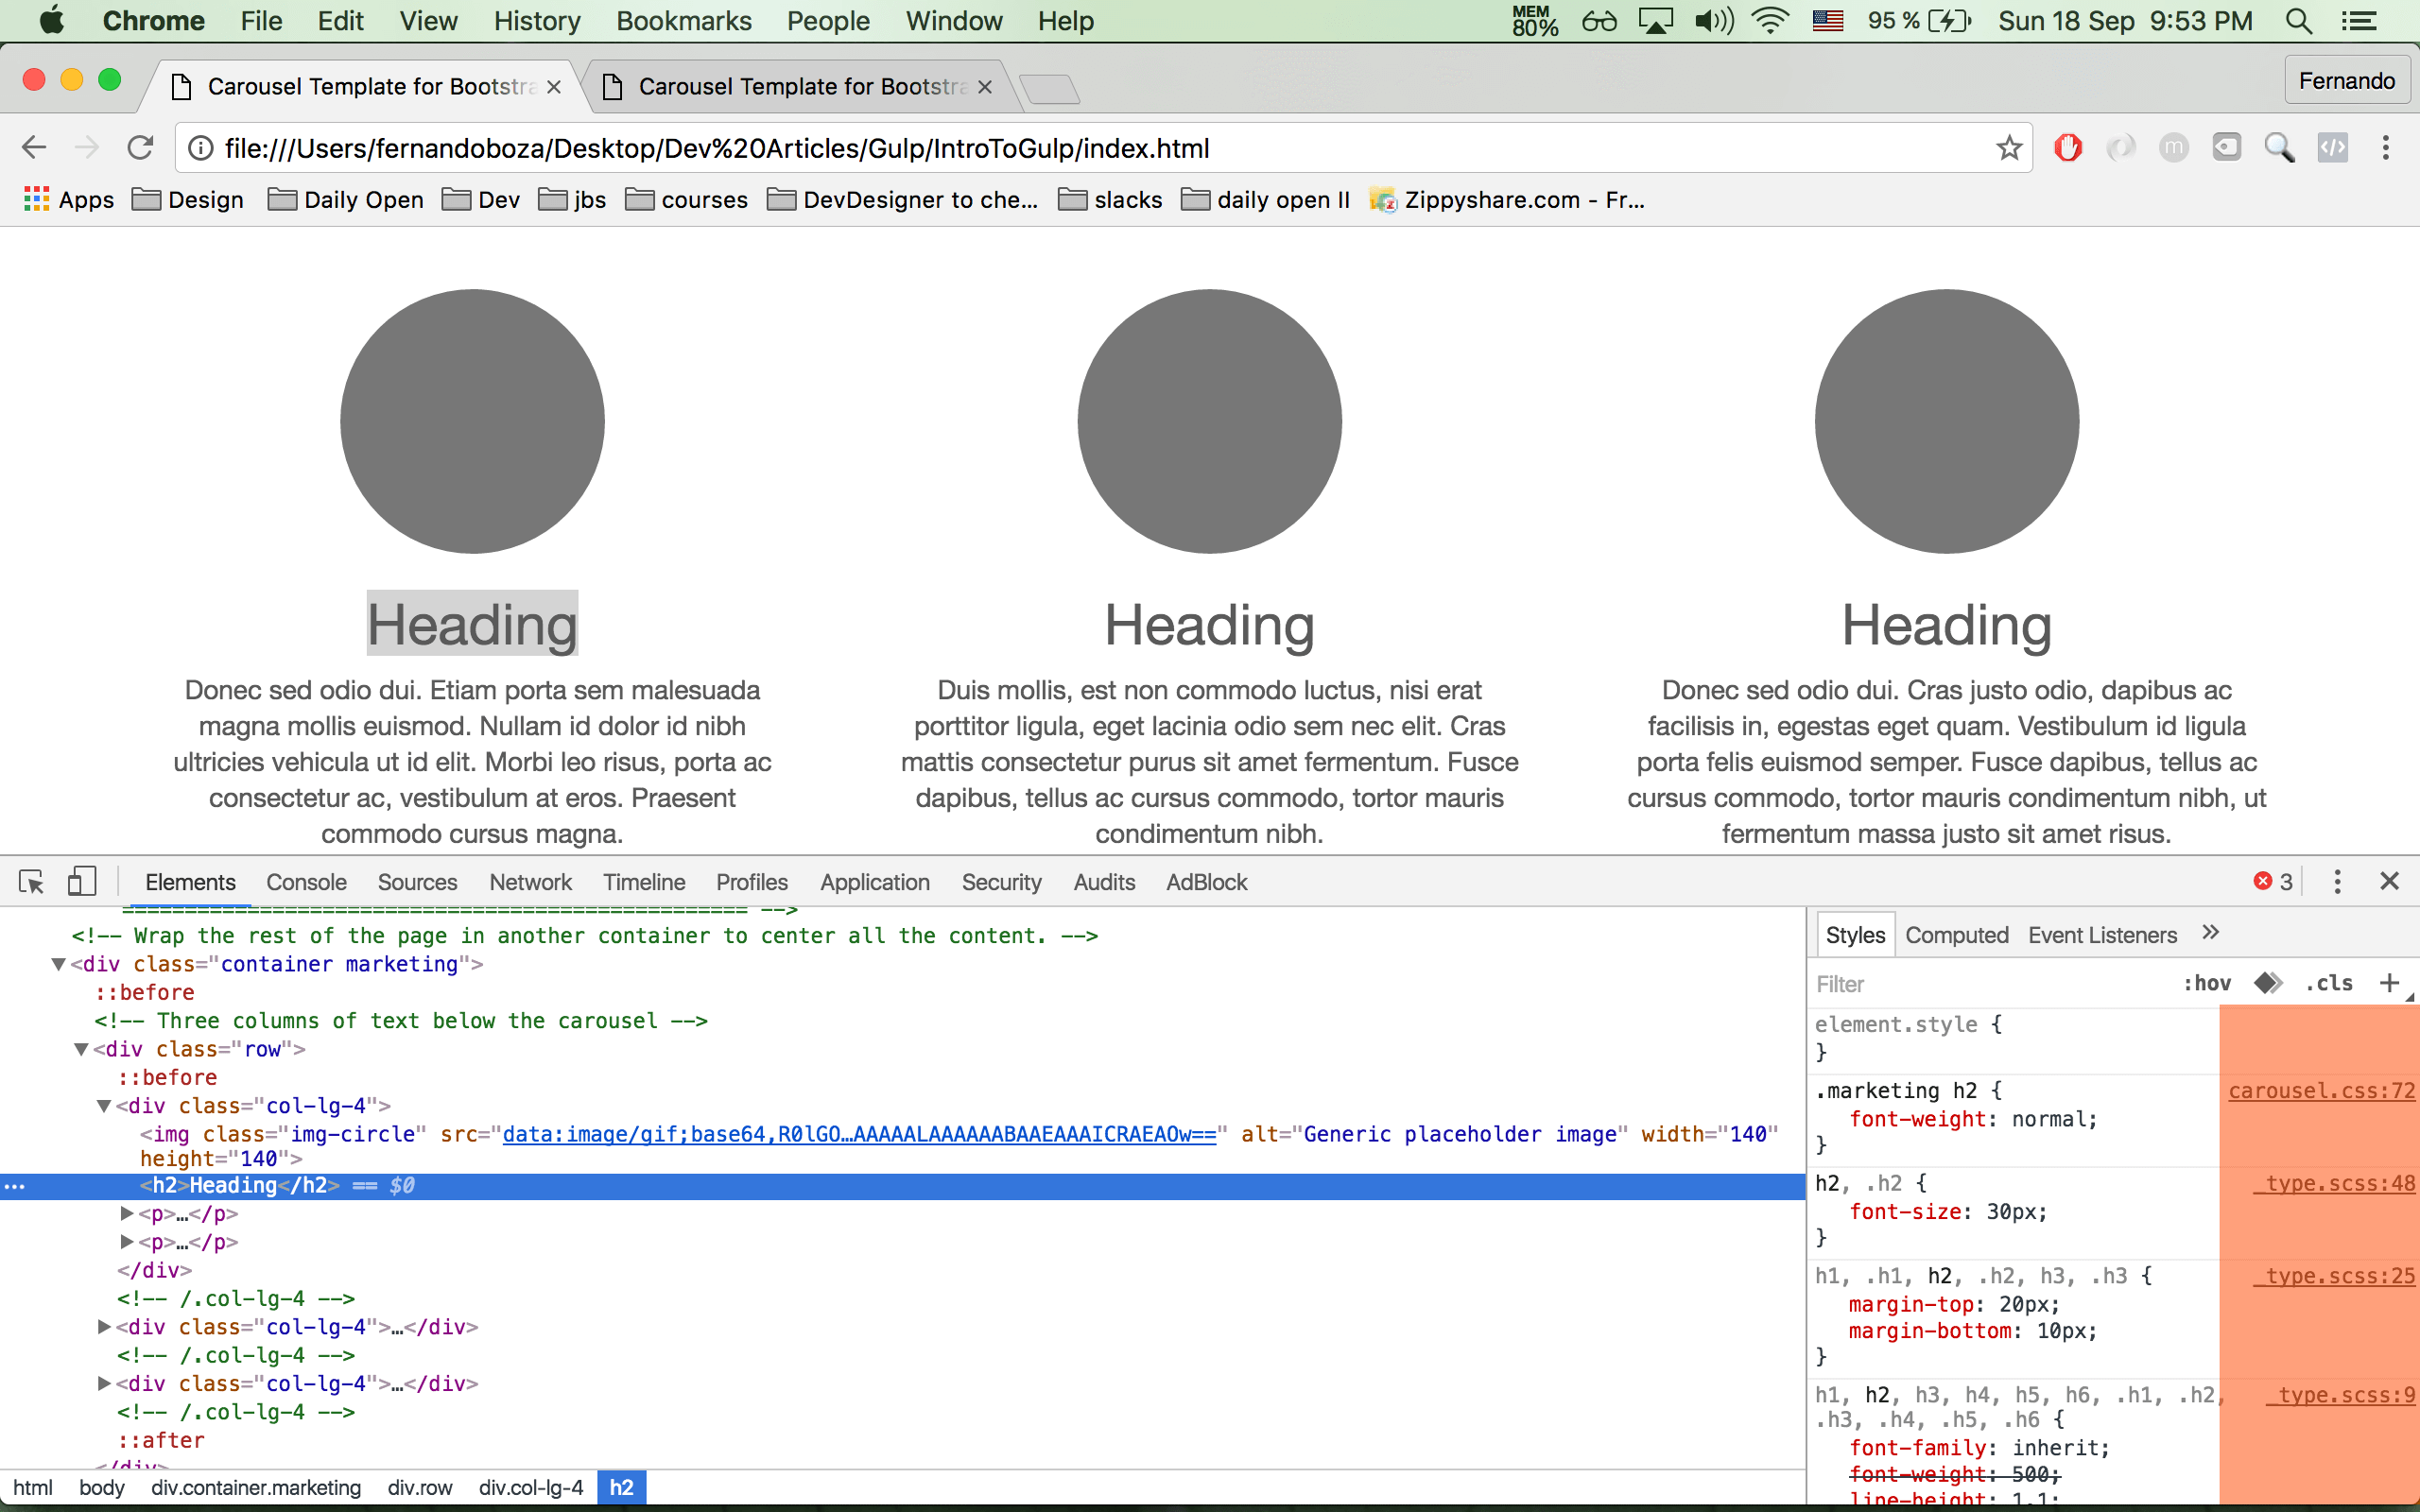
In our 1st example we can see our target selectors our in the thousand range in our CSS. But in the 2nd example we see more specifically which Sass file they’re located AND which line. Giving us a more precise option to edit our code. As well as we know, you should NEVER change your Sass compiled CSS file, instead work directly one the sass file. Now let’s quickly add our sass maps.
npm install gulp-sourcemaps --save-dev
and again import as a requirement in our gulpfile.js file. Now back in our compile task let’s add a new write our maps and pipe them out to our css folder
gulp.task('compileSass', function(){
    gulp.src("scss/bootstrap.scss")
        .pipe(maps.init())
        .pipe(sass())
        .pipe(maps.write('./'))
        .pipe(gulp.dest('./css'));
});
Now let’s rerun our gulp compileSass in our console, and new file called bootstrap.css.map is created. To test it our, refresh index.html and inspect element on any element in the page and check to see which specific Sass file it’s selectors are on. Good job, now we know how to compile sass and create source maps, let’s now move how we can better improve our javascript.
Before we move on, it’s important to take a look at the order,
First we initialise the maps.
Second we compile our sass files.
Third we write our source maps in the current folder.
Forth we specify where we want our maps and compiled css file.
Combine and Conquer
If you we go to ending lines of our body tag you will see 3 javascript files, bootstrap, holder, and ie10-viewport-bug-workaround.js. Now as you can imagine, each and every single time our page is loading, the client has to load and run each file separately, which in turn takes longer for our page to load. So let’s combine or specifically concat’ all 3 files into a single javascript. Let’s go back to our console and npm install concat
npm install gulp-concat --save-dev
Back in our gulpfile let’s import it and call it concat
var concat = require('gulp-concat');
Now below our compileSass let’s create a new task called concatScript and as before we call the gulp.task method.
gulp.task('concatScript', function () {
    gulp.src([
        'js/bootstrap.js',
        'js/holder.js',
        'js/ie10-viewport-bug-workaround.js'
    ])
    .pipe(maps.init())
    .pipe(concat('app.js'))
    .pipe(maps.write('./'))
    .pipe(gulp.dest('./js'));
});
As you can see I’ve also added a method to create maps for our compiled javascript file which concat will create named app.js ’. Now to get our compiled javascript filed let’s run gulp concatScripts
Now if we go to our javascript folder, we’ll see 2 new files, our app.js and app.js.map. You don’t need to worry about the maps file but if you take a look at our app.js you will see it contains all the code from all 3 files. And the same applies for the maps, in the Chrome Dev tools if you wanted to know which js file you’re targeting, you can view which specific file it’s contributing to app.js.
So Ugly Only A Developer Can Love
If you’re still new to coding and developing, then you might have been confused as to seeing all this min.css or min.js. What’s even more confused is when take a look and you see just 2 or 3 lines of code that run off infinite. We’ll there are many benefits of minifying’ or compressing our code. The number 1 benefit is a smaller file saves saves broadband for the user or client. So let’s open our console and get started.
npm install gulp-uglify gulp-rename --save-dev
And as always import it to our gulp file and create a new task called compress.
gulp.task('compress', function () {
gulp.src('./js/app.js')
    .pipe(uglify())
    .pipe(rename('app.min.js'))
    .pipe(gulp.dest('./js'));
});
So let’s take a look at the code, we have our gulp source, followed by calling our gulp-uglify or just uglify, this compress all our code. After we have a rename method, how this works is it creates a new file called app.min.js which is where it will export our compress javascript file, leaving our app.js file intact. So our app.js file is our development file and app. min .js is our production file. No worries if you don’t understand now but for now imagine CSS and Sass, you export CSS but modify the Sass. And finally we have our gulp.dest for the location.
So let’s run gulp compress and when we do, in our js folder you will find app.min.js file along with our app.js file, now in our index.html file you can replace at the bottom of the body tag
<script src=“./js/app.js"></script>
with
<script src=“./js/app.min.js"></script>
Look At That Sass ... and JS
If you’ve already done Sass then you know of sass —watch where it automatically updates our css file anytime we do real-time changes to our sass file. Well now let’s create gulp task that will watch both our sass and js files at the same time.
gulp.task(' watchFile ', function() {
    gulp.watch('scss/**/*.scss', ['compileSass']);
    gulp.watch('js/app.js', ['concatScript']);
});
So we are looking at a new gulp method, watch, which is as is, it watches the original file composition and updates it in real time. To check it out just console run gulp watchFile, but now let’s wrap up everything to create a new command that runs every task.
Coming All Together
Alright, so far you’ve created 4 gulp task that makes our project easier to manage and a lot lighter than before.
Now before we create a single gulp command that runs all our task, let’s first change our compress, now you might be asking why? Well once again young padawan, our task don’t run in order, instead it’s like a race whoever can finish the task the fastest does so, and while majority of times this could be a wonderful thing, for our compress task it not one of those cases. Remember to compress all app.js file we first need a app.js file, and what if our concatScripts are still running and compress is already done with whatever code was in the app.js file.
To fix this it’s really quite simple, we will just state that for compress to run it needs to depend or a dependencies on concatScripts.
gulp.task('compress', ['concatScript'], function () {
    return gulp.src('./js/app.js')
    .pipe(uglify())
    .pipe(rename('app.min.js'))
    .pipe(gulp.dest('./js'));
});
As you can see after our task name, we added in an array our dependancies, in other cases we can add more, but here we just need concatScripts to finish first THEN compress task will run. Also
you can see we added a return statement to our gulp source. This is mandatory ANYTIME we add dependencies. And for convince sake let’s add return before all our gulp sources in our concatScripts, and compileSass.
Now let’s create that single command that runs all our task at once instead of individually, minus watchFiles.
First let’s create a new task called build and add the task we want to run as dependancies
gulp.task('build', ['compress','compileSass'], function(){
    return gulp.src([
        'css/bootstrap.css',
        'js/app.min.js',
        './index.html'
    ],{ base: './' })
    .pipe(gulp.dest('dist'));
});
Now as you can see we are creating our css, and js files including our index.html in a new folder called dist or distribution, this will be what will be uploaded on to our server. If you now check the directory you will see a new folder called dist with a css folder holding our sass, js folder holding our javascript and our same html file.
So here we have a single task called build that will run all our task AND export them to a new folder called dist which is what we would use in our production environment or which we will upload to our server. Now if we console run gulp build, we will have our task run in order AND export all our files to our production folder called dist.
Now let’s take it one step further, let’s create a new command that we could just run gulp by itself.
gulp.task('default', ['build']);
By using the keyword default’ gulp knows that whatever dependencies are within to run with just the command gulp, no return statement needed.
Conclusion
Well congrats we have built a fully capable task manager with Gulp, as you can see it’s really simple to start. Now in the future when you start working on other people’s gulp file and are a bit lost, it’s always best to start from the bottom way up to see what is depending on what and the order.
For more great information on gulp you can check out their website and also their getting started and documentation for more task on how to simplify your workflow.
Well folks hope you all enjoyed and learned how to take your skill a level up or two. As always
happy coding.